.webp)

.svg)

Artwork Guidelines For Printing
There are three important terms to keep in mind when discussing print-ready artwork: Vector, Raster, and DPI.
Vector images are created on a computer and are defined in terms of points on a Cartesian plane that form lines, polygons, and other shapes. This gives them the unique ability to be scaled in size (up or down) without losing quality.
Raster images (also called bitmap) are created using a dot matrix structure of pixels. This image format is resolution (DPI) dependent and as its dimensions are changed the image will degrade in quality. When dealing with this format in print we recommend 300 DPI (dots per inch) and of decent size. No small thumbnail images, etc.
Raster Vs. Vector
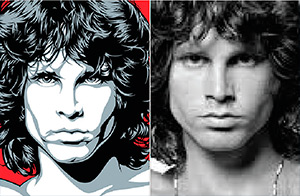
2 File Types
There are two types of ways to create a file. Raster or Vector. The one you choose depends on what you are trying to accomplish. Vector is an image created from lines and shapes, such as a drawing or cartoon. Raster is an image created from many small dots to produce a larger image, such as a real life photograph.
If you are printing a logo, icon, text, or any other image that can be created using lines we recommend sending us a vector file. Vector files can be expanded to any size without loss of quality or integrity.
If you are printing a photograph, advanced graphic, or painting, we recommend sending us a raster file. This will allow us to properly print or alter your design without compromising the image. However, resolution (DPI) will be very important with raster files.
Proper Print Quality Of Raster Images
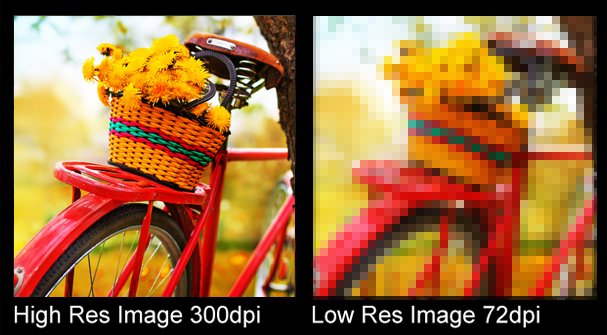
Resolution (DPI)
The quality of raster images is determined by its resolution (also known as DPI). We like to see files sent in at 300 DPI or at least as close as possible. This will help prevent pixilation/blurriness when your file prints.
The 300 DPI needs to be from the original file. You CAN NOT take a low resolution image or copy and make it higher quality by re-saving it in a different program or format.
Setting Your Colors

CMYK vs. RGB
When printing, we always recommend you design and send your files in CMYK color format. This most accurately represents the correct color when printing. RGB is NOT recommended.
It is important to note that colors will look differently among computer, phone, or tablet screens. Every screen has different color profiles and looking at the same color on one screen may seem different on another. Colors on screen will always be a representation of what actually prints.
We always welcome CMYK PANTONE color codes. This will lock in specific color formulas and produce more accurate results. Our latest PANTONE certified printers allows most colors to be printed fairly closely. However, some PANTONE colors are outside the color gamut and cannot be represented.
We recommend the PANTONE Color Bridge Coated version for printing. There are physical fanbooks online and digital versions in Adobe Photoshop and Illustrator. Please note, PANTONE fanbooks that you may find in paint stores, etc. will NOT work.
Adjusting Your Bleed

Bleed Size Recommendation
Bleed is extra material and color that extends beyond the true edge of your print. This is important because it near impossible to die-cut or trim to the exact edge of a print. If you have seen a decal that had a thin white edge around it, it was probably due to there not being any bleed built into the design. Bleed ensures that coverage remains edge to edge after cutting.
Using .125 inches of bleed is a good start. Make sure your canvas or artboard size is .125" larger all the way around than the final trim or expected size. For instance, if you are expecting a final cut decal to be 15" H x 10" W, your canvas/artboard size will need to be 15.25" H x 10.25" W. Set your guidelines in from the edge .125" to remind you where the print will be cut. Extend all color and design features past the guidelines and to the edge of the canvas/artboard. DO NOT place any important text close to the bleed lines, as they could get cut off during finishing.
Proper Font Format

Outline Your Fonts Before Printing
Outlining fonts will freeze its appearance and guarantee it stays true when we open the file. If they are not outlined, font substitution could occur. Outlining your fonts also makes it easier to send files, since you are sending one complete file without the need to send separate font files.
One of the most popular design programs is Adobe Illustrator. We use it everyday and it is very easy to outline your fonts within the program. Follow these easy steps using Adobe 2021:
1) Open your design file
2) Select your fonts (left click of the mouse)
3) Right click and select Create Outlines
Applying Your Cut Path
Die Cutting Preferences
If your project is cut to shape, we ask that you supply us with a cut path. A cut path is a vector shape that allows our cutter to read and match up with registration marks. A simple one pixel stroke on the shape is needed, and preferably placed on a separate layer named “Cut Path”.
.svg)